Showing posts with label DIY. Show all posts

31/10/2012

DIY project: My own homemade soaps!


You read that right:
I got real crafty last summer!

If you're like me -obsessed with beauty and cosmetics, that is-, read on because there's a whole 'nother world you can let loose your passion: making your own beauty products! I proudly present you my first batch of homemade olive oil soaps- which, contrary to what you might think, they're dead easy to make.

But why soaps, you might ask?
It was only because I didn't want to waste a huge 5lt can of olive oil that didn't taste quite right. Throwing it away was not an option, so I had to find a means to make it useful ;)


First and foremost, there's two things you need to keep in mind before experimenting with soap-making recipes:

a. Do your homework. Even the tiniest little search online will be enough to baffle you with contradicting recipes. So before settling on a particular recipe, learn about the characteristics of each ingredient, what quality of soap they produce, and the importance of accuracy in weighing each quantity.

b. Take all precautions necessary! It's very, very important not to let the lye get in contact with your skin. Or your eyes and nose. Get youselves some gloves, an old blouse with long sleeves, a face mask, and some vinegar in case you spill yourself with some soap mixture by accident (vinegar counteracts the lye in the soap).

14/11/2011

How I depot my eyeshadows


Someone had asked me how I depot my Body Shop eyeshadows into the Elf quads; so now that I had an extra empty palette from my last Elf order, I thought of taking some pics to show you how it's done!

     List of products used: 4 eyeshadows, an empty palette and a crooked
     hair pin ;)

     First off, I removed the sticker from the back of the eyeshadows... 

     Notice the little holes that reveal part of the eyeshadow metal pan?

     Then I popped all eyeshadows in the oven at around 100°C for 10',
     so that the glue that holds the metal pan together with the plastic
     container gets loosed up...

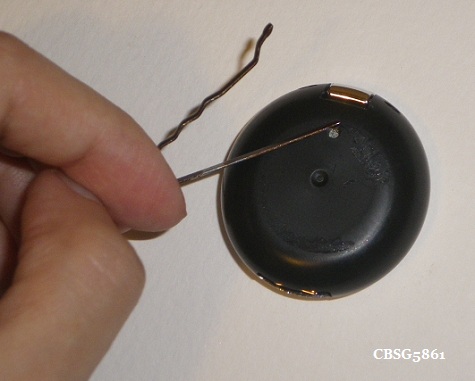
     Then I just take the hair pin and poke the metal pan through the
     tiny hole, and...

     ...ta-da! Eyeshadow pan removed from the plastic pot!

     There was some left over glue at the back of the pans so they
     sticked nicely into the quad.

Dead-simple, right?

Apart from the Body Shop, these palettes hold eyeshadows by Mac, l'Oreal, Urban Decay, etc. Also, the plastic divider can be removed so that you can pop in eyeshadow pans of any size! Although I have to point out that the metal base is not magnetised but still, for 1,70E I'm more than contempt with my purchase! Made my eyeshadow stash A LOT more organised- so thank you Elf!

CBSG5861

19/05/2010

How to fix a broken eyeshadow

Hello my lovelies!

I get so depressed when I accidentally drop a pan of eyeshadow and it breaks in pieces :(


These two got broken a couple of months ago and since then I haven't touched them at all- such a shame because the right one is my favourite! I couldn't postpone it any longer, so today I got my tools and tried to fix them. This is how I did it:


I used:
- rubbing alcohol
- an empty sample jar
- some q-tips
- a toothpick
- a coin to press the pigment
- some tissues


I broke the eyeshadow in pieces with the help of the toothpick...


I cleaned the sample jar with some alcohol and then emptied the broken eyeshadow...


I also cleaned the pan with some alcohol and broke all pieces of eyeshadow into a powder with the help of a q-tip (which has a flatter head)...


Then I added 5-6 drops of alcohol into the powder eyeshadow and mixed it thoroughly...


I emptied the paste into the eyeshadow pan...


I placed the coin in the centre of a tissue, folded it so that it forms a kind of pressing tool and pressed the pigment sooo hard that my hands ached...


And this is the end result! Ok, it's not perfect- you can see some cracks in the perimeter of the pan, but at least it won't leak brown powder in my make-up bag ;)


I used for the left eyeshadow more drops of alcohol, so the paste got less thick and the pattern of the tissue was printed on the surface.

No matter the result of a DIY project, at the end I'm always proud of it... Now I'm hoping I don't break another one and force myself to improve my skills ;)

Happy blogging and reading and commenting to everyone!

CBSG5861

22/01/2010

DIY attempt #1; Thread Bracelet

Hello my lovelies!


This was my first attempt to make a custom bracelet with beads and red thread.
Well, let's just say that "beginner's luck" didn't apply on this case...

Man, until I could get the hang of it I used 3 needles, some loooong pieces of thread, my teeth, oh....
It could be perfect, but I think it's cute as it is. Maybe I'll wear it along with this "meow" necklace that my mom got me ;)


So, what do you guys think?
Is it worth it experimenting on do-it-yourself projects?

Happy blogging and reading and commenting to everyone!

CBSG5861
Related Posts Plugin for WordPress, Blogger...